Manually validate a PDF
Besides the online signature verification page, you can inspect a signed PDF file directly. A fully signed Autosignly document contains two layers of evidence:
- PAdES digital signatures — cryptographic signatures embedded in the PDF (visible signer stamps and invisible integrity seals).
- XMP metadata — structured information about each signer, written into the document after all signers have completed signing.
XMP is added only when the document status becomes Signed (every signer has finished).
A PDF still Signing in progress may contain visible stamps and PAdES signatures for
completed signers, but not yet the full autodoc:signatures block.
1. Check digital signatures (PAdES)
Use any PDF viewer with a Signatures panel:
- Open the PDF.
- Open the signatures / certificates panel in your viewer.
- Select each signature and review:
- Signer — reason text such as Signed on behalf of: First Last, email: …
- Signing time
- Document modification status after signing
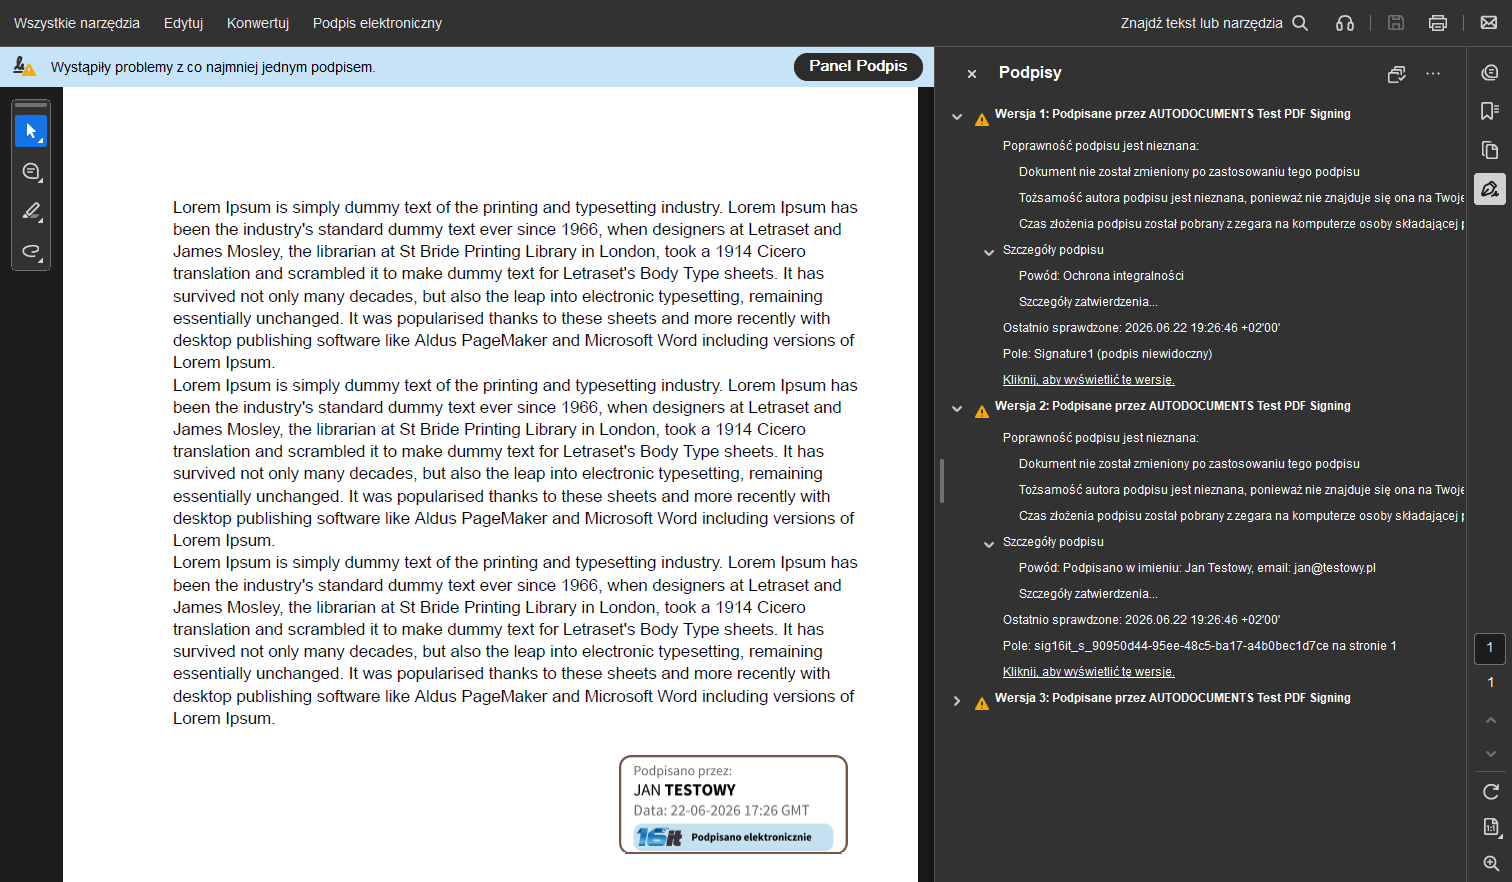
Autosignly documents typically contain:
| Signature | When added | Visible stamp |
|---|---|---|
| Integrity seal (first) | Before signing starts | No |
| Signer signature(s) | When each person signs | Yes |
| Integrity seal (final) | After all signers + XMP | No |
Integrity seals use the reason Integrity protection or Ochrona integralności, depending on the document language. Signer signatures use Signed on behalf of: … or Podpisano w imieniu: ….
A self-signed Autosignly certificate is used for SES/AES server-side signatures. QES signatures use the signer's qualified certificate on the USB token. The signature panel shows which certificate signed each field.
2. Extract XMP metadata
XMP metadata is embedded in the PDF document metadata stream. Signer fields belong to a custom
namespace with URI identifier http://16it.pl/ns/signature/1.0/ (prefix autodoc:).
Option A — ExifTool (command line)
ExifTool is the quickest way to dump all XMP:
exiftool -XMP:All signed-document.pdf
To see the raw XML packet:
exiftool -b -XMP:All signed-document.pdf
On Windows (PowerShell), install ExifTool if needed (winget install OliverBetz.ExifTool),
then restart the terminal:
exiftool -XMP:All C:\path\to\signed-document.pdf
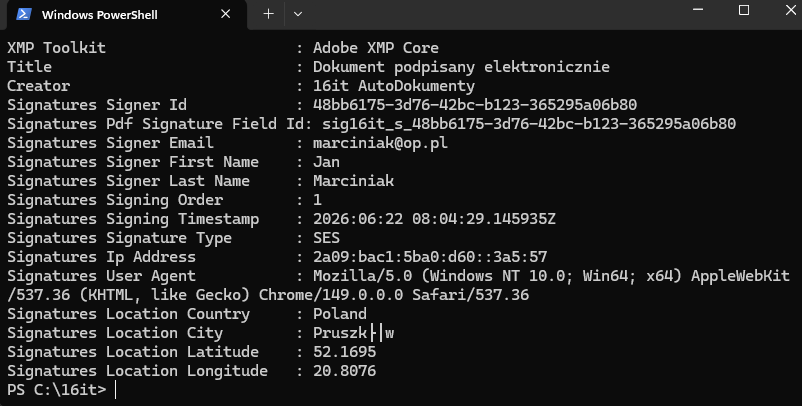
Option B — ExifToolGUI (graphical)
ExifToolGUI is a free desktop interface for ExifTool — no command line required. It shows the same XMP fields as Option A in a window.
Install on Windows:
winget install FrankBijnen.ExifToolGUI
ExifToolGUI needs ExifTool on the system (winget install OliverBetz.ExifTool).
- Open ExifToolGUI.
- In the Folders panel (on the left), browse to the folder containing your signed PDF and click the file in the centre file list. You can also drag and drop the file (or folder) from Windows Explorer onto the application window.
- On the right, open Metadata → Xmp — look for the XMP-autodoc section and fields such as SignaturesSignerEmail, SignaturesSigningTimestamp, SignaturesSignatureType.
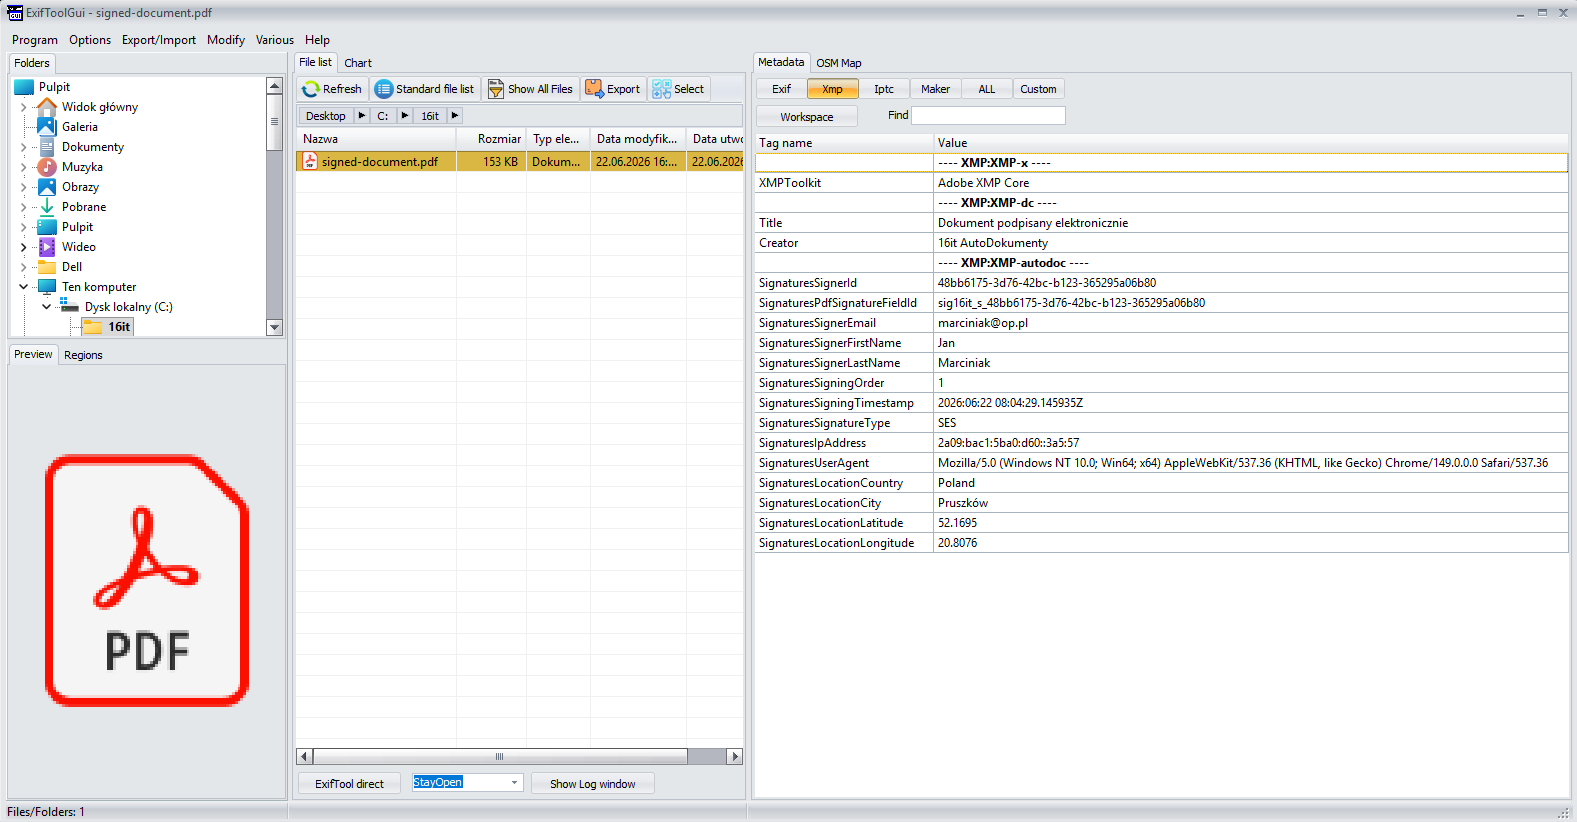
Do not edit or save metadata in ExifToolGUI for signed documents — read-only inspection is enough and avoids altering the file.
3. Read signer metadata fields
Inside the XMP packet, each signer is listed under autodoc:signatures as one
rdf:li entry. Example (abbreviated):
<autodoc:signatures>
<rdf:Bag>
<rdf:li>
<rdf:Description>
<autodoc:signerId>…</autodoc:signerId>
<autodoc:signerFirstName>Jan</autodoc:signerFirstName>
<autodoc:signerLastName>Kowalski</autodoc:signerLastName>
<autodoc:signingOrder>1</autodoc:signingOrder>
<autodoc:signingTimestamp>2026-06-22T10:15:30Z</autodoc:signingTimestamp>
<autodoc:signatureType>AES</autodoc:signatureType>
<autodoc:ipAddress>203.0.113.10</autodoc:ipAddress>
<autodoc:userAgent>Mozilla/5.0 …</autodoc:userAgent>
<autodoc:locationCountry>PL</autodoc:locationCountry>
<autodoc:locationCity>Warsaw</autodoc:locationCity>
<autodoc:phoneNumber>+48123456789</autodoc:phoneNumber>
</rdf:Description>
</rdf:li>
</rdf:Bag>
</autodoc:signatures>
Field reference
| XMP field | Description |
|---|---|
signerId | Internal signer identifier |
pdfSignatureFieldId | PDF signature field name linked to this signer |
signerEmail | Signer's e-mail address |
signerFirstName, signerLastName | Signer's name |
signingOrder | Order in the signing sequence (1, 2, …) |
signingTimestamp | UTC time of signing (ISO-8601) |
signatureType | SES, AES, or QES |
ipAddress | Client IP at signing time |
userAgent | Browser / client user-agent string |
locationCountry, locationCity | Geo lookup from IP |
locationLatitude, locationLongitude | Coordinates from geo lookup |
phoneNumber | Phone used for SMS verification (AES) |
verificationOrigin | Identity source when Węzeł Krajowy was used |
verificationCorrelationId | Correlation ID from Węzeł Krajowy flow |
verifiedPersonIdentifier | Verified person ID (Węzeł Krajowy) |
verifiedFirstName, verifiedFamilyName | Verified name (Węzeł Krajowy) |
verifiedDateOfBirth, verifiedBirthName, verifiedPlaceOfBirth | Verified birth data |
verifiedGender, verifiedCurrentAddress | Additional verified attributes |
Węzeł Krajowy fields appear only when the issuer chose Węzeł Krajowy verification instead of SMS for an AES signature.
4. Match XMP to a visible signature
Each signer's visible stamp corresponds to a PAdES signature field. Use
pdfSignatureFieldId in XMP to link metadata to a specific signature entry in the PDF
signature panel. The Reason on that signature contains the signer's name and e-mail.
Online vs manual verification
| Method | What it checks | Login required |
|---|---|---|
| Online verification | Signature validity, signer name, signing date, signature type (PAdES + Autosignly metadata) | No |
| PAdES panel in PDF viewer | Cryptographic signature validity, modification after sign | No |
| XMP inspection (ExifTool, ExifToolGUI) | Raw signer metadata in the file (autodoc:signatures) | No |
For day-to-day checks, use online verification. For audits or integration testing, inspect the PDF directly — the PAdES panel and XMP extraction as described in Manually validate a PDF.
For the signing process overview, see Signing documents.